Here’s another dev thing I use: MochaJS in Visual Studio Team Services (VSTS) builds and display the test reports as part of the build reports. See? Like this.

This wasn’t me trying to fit a square peg into a round hole. VSTS is exceptionally flexible and it comes bundled with all the pieces you need to do this out of the box. The key is making sure that we setup our test runner to produce the output VSTS needs.
Step 0: Assumptions
I’m not going to explain how to do this, but I’m going to assume you have a project with tests that use MochaJS. So, you can run mocha from the terminal and your tests run.
I’m also not going to explain that to use VSTS, you need a VSTS account. They are free to start and you’ll need one to make this work. It’s worth the effort.
Step 1: Script Your Test Command
Personally, I use npm scripts for this. I just figure out what my test command is, and then have the npm test script run that. In my project, I run the locally installed version of MochaJS and use the recursive flag.
./node_modules/.bin/mocha --recursivenIn my package.json file, I have:
"scripts": {You can just as easily use a Bash or Powershell script for this too if you’re not a fan of npm scripts. But you should be.
"test": "./node_modules/.bin/mocha --recursive"
}
Step 2: Use the mocha-junit-reporter
Woah, wait a minute? This is JavaScript not Java.
I know, but JUnit reports are a standard report format that is supported by VSTS. The key is making sure that our mocha test reports are being output into a format that VSTS can understand. VSTS does not care about your test report to standard out.
Mocha doesn’t come bundled with a JUnit reporter, so I used mocha-junit-reporter which outputs a test-results.xml file to the root project directory by default. I don’t like the default, so I have it output to a directory of my choosing.
So, first we run: npm install --save-dev mocha-junit-reporter
Then, we update our npm test command in package.json to
"scripts": {
    "test": "./node_modules/.bin/mocha --recursive --reporter mocha-unit-reporter --reporter-options mochaFile=./test-output/test-results.xml"
}
Don’t forget to add test output directory to your .gitignore file.
(OPTIONAL) Step 2a: Using Mutliple Reporters
But now I can’t see my tests in the terminal output!
I didn’t like that either, so I fixed it by using another Mocha extension called mocha-multi-reporters. It lets us define mutlple reporters for MochaJS and specify reporter parameters in a config.json file that we save in the project root.
First, install the tool: npm install --save-dev mocha-multi-reporters.
Then, we update our npm test command to
"scripts": {
    "test": "./node_modules/.bin/mocha --recursive --reporter=mocha-multi-reporters"
}
And finally, we add a config.json file to the project root. I’m using the spec and mocha-junit-reporter, which result in this config.json:
{
    "reporterEnabled": "spec,mocha-junit-reporter",
    "mochaJunitReporterReporterOptions": {
        "mochaFile": "./.test_output/test-results.xml"
    }
}
It’s not perfect, but it works well enough for my purposes.
Gotcha! You should use Mocha-Multi
I tried using mocha-multi and I couldn’t get it to work with the parameter for mocha-junit-reporter.
Gotcha! This produces an xunit.xml file in the root directory
It’s a bug with mocha-multi-reporters that I’ve reported. I’m hoping to get a pull request in for it soon, as it’s a pretty easy fix.
The workaround is to add xunit.xml to your .gitignore file and ignore it yourself.
Step 3: Run Test Script in your VSTS Build
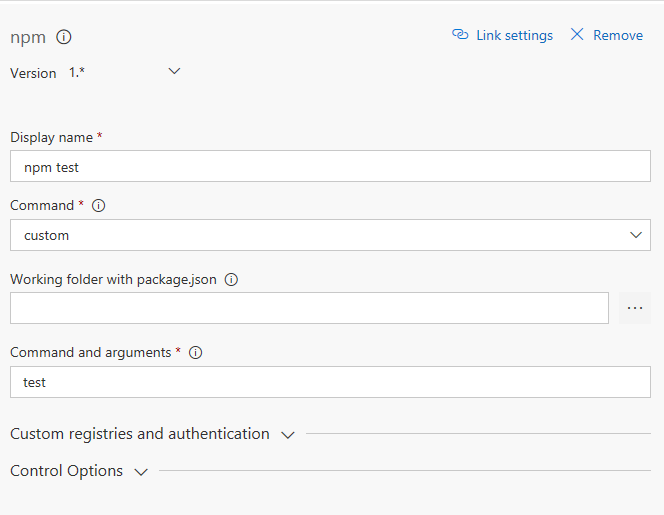
To run your test script, you need to add a build task in VSTS. In our case, we’re adding the NPM buid task, and configuring it to run our npm test command. The build task properties I use are:
- Version: 1.*
- Display Name: npm test
- Command: custom
- Command and arguments: test
Here’s what it looks like:

Step 4: Publish the Test Results in VSTS
For our last step, we need to publish the test results report to VSTS and tell it how to read it.
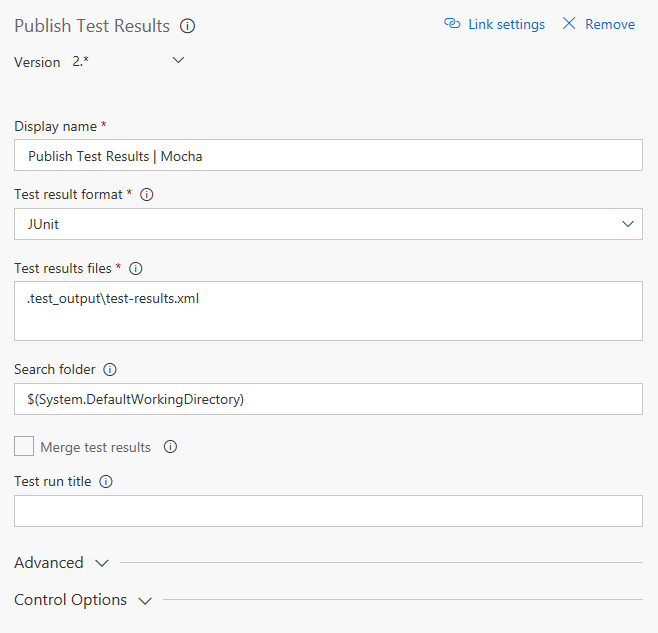
We do this with the Publish Test Results build step in VSTS and configure it with the following properties.
- Version: 2.*
- Display name: Publish Test Results | Mocha
- Test result format: JUnit
- Search folder: $(System.DefaultWorkingDirectory)
Which looks something like this:

Step 5: Done
And with that, you’re good to go to capture and explore your MochaJS test results from within your VSTS build report.
Happy test reporting!
Leave a Reply